A chronicle of issues encountered in SharePoint

Category: Office 365 Page 2 of 3

Left Nav Missing After Applying May 2022 CU for SharePoint Server 2019

Fortunately for me, I’ve switched over to SharePoint Online.  However, for those admins who are running SharePoint Server 2019 on-premise, the recently released May 2022 Cumulative Update (CU) may make your entire left-hand navigation disappear!  Thankfully, Stefan Goßner at Microsoft has posted the issue details and the resolution on his wonderful blog.

Remember: when installing SharePoint Server patches,  you’ll want to install both the language-dependent and the language-independent fixes, then run PSCONFIG.

The SharePoint Online App Bar

Recently, Microsoft has added a nifty button in the upper-left corner of SharePoint Online (part of the Microsoft 365 package) that renders the logged-in user’s recent history for Sites, Lists, and Files, as well as recommended news and global navigation.  The App Bar button is just to the right of the Microsoft 365 “waffle” icon and is available throughout.

For end users: https://support.microsoft.com/en-us/office/use-the-sharepoint-app-bar-b2ab82d5-9af7-445e-ad24-236c5a86b5f8?ui=en-us&rs=en-us&ad=us

It is interesting to note that it is not (yet?) available on Classic sites and customization is limited to the global navigation pane.

For admins: https://docs.microsoft.com/en-us/viva/connections/sharepoint-app-bar

OneDrive admin center settings are coming to the SharePoint admin center

This is good news.  For those of us who have SharePoint Online admin access but do not have admin access over the entire Microsoft 365 tenant, this will give us a little more ownership.  The post was released previously but updated today.  It may take even longer for those of us on the Government Cloud (GCC):

//  MC240393 · Published Feb 18, 2021 · Last updated May 4, 2021 · pasted below //

“The OneDrive and SharePoint admin centers are converging into one, providing you with holistic control as we streamline the admin experience.  [By that they mean “converging into the existing SharePoint admin center”.]

This feature is associated with Microsoft 365 Roadmap ID 65911.

Automation options for SharePoint Online

There has been, and continues to be, a lot of buzz about PowerApps in Microsoft365 (previously called Office365). As the workflow engines behind SharePoint 2010 and SharePoint 2013 workflows are disabled and soon to be disabled (respectively) for SharePoint Online, the push is to rewrite them for SharePoint Online using PowerApps. That’s pretty much the consistent message I’m hearing.  You don’t have a choice: the answer going forward is Power Automate.

However, Microsoft has another automation platform that is housed in Azure instead and may work better for automating tasks across your Azure portal. It’s called Logic Apps. It may actually prove better at integrating with other enterprise applications, particularly those housed in Azure.  Read up on it for yourself.

Obviously, one key difference is that Logic Apps run on Azure so for those who have an Azure subscription but are not subscribers to Microsoft365, then it’s a clear choice to go with Logic Apps.  Vice-versa for those who have a Microsoft365 subscription but do not have an Azure subscription.  For those of us who have both, Microsoft has put together this comparison of Logic Apps vs Power Automate, which they’re still calling Flow in this older presentation.

Last but not least, Thijs Lecomte has posted Why You Should Use Logic Apps Instead of Power Automate which I find compelling and helpful.  Hopefully this post will encourage you to explore your options a little more.  Happy Automating.


Error connecting to Microsoft365 using MFA: The sign-in name or password does not match one in the Microsoft account system

If you have received any of these errors lately trying to connect via Multi-Factor Authentication (MFA) to your Microsoft365 tenant using PowerShell, the resolution may be that you need to revise your login script.

Click each image to open in a new window.

Connect-PnPonline: root element is missing

Connect-PnPonline: The sign-in name or password does not match one in the Microsoft account system.

Connect-SPOservice: The sign-in name or password does not match one in the Microsoft account system.

Simply put, the resolution we’ve found is to use the -UseWebLogin parameter with both cmdlets Connect-PnPOnline and Connect-SPOService

By using -UseWebLogin instead of -Credentials it gives a pop up for your login info and lets you access the system, particularly if you are using Multi-factor Authentication (MFA). Connect-SPOService is similar, but you just take out the -Credentials altogether and it will do the same.

Old way

$url = "https://<tenantname>.sharepoint.com/"
$credentials = Get-Credential
Connect-PnPOnline -Url $url -Credentials $credentials

New way

$url = "https://<tenantname>.sharepoint.com/"
Connect-PnPOnline -Url $url -UseWebLogin


Many thanks to my colleague Josh Nissen who figured this out and also contributed to the content of this article.


View Workflow History

With Microsoft disabling SharePoint 2010 workflows in Microsoft365, you may find yourself hurriedly creating an inventory of all of your workflows in SharePoint Online so you can rewrite them in PowerAutomate or Nintex. It would be helpful to know the last time a workflow was ran and/or how much that workflow is being used (if ever?).

Personally, I was not impressed with the Modernization Scanner provided by Microsoft.  I did not find it to be reliable on quite a few things, particularly the Action Count.  

Fortunately, there is this script from a fellow named Joe Rodgers which adds five additional columns to the CSV file produced by the Modernization Scanner.  In particular, the second newly appended column is “ExecutionCountLastSixtyDays” which reports the number  of workflow instances in your tenant that have ran over the previous 60 days. So if you run the Modernization Scanner, then definitely run Joe’s script as well.

Behind the scenes, every time a workflow runs a workflow history list is updated.  Each site collection that has a workflow will have a Workflow History list which is hidden by default and not shown in Site Contents.

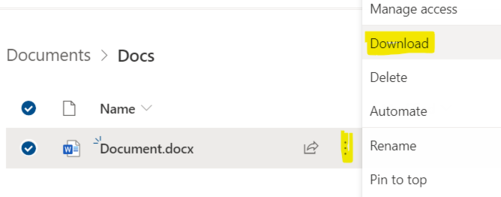
If you want to view the records in the Workflow History list, simply append
/Lists/Workflow History/allitems.aspx to the site collection URL. Hence, https://domain.sharepoint.com/sites/Lists/Workflow History/allitems.aspx

If you want to permanently have it show in Site Contents, you can do the following from within SharePoint Designer 2013. 

  1. Open SharePoint Designer 2013 and go to your desired Site Collection.
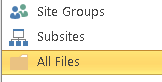
  2. On the left navigation, select All Files (at the bottom)

  3. In the right pane, select the item “Lists”
  4. In Lists, scroll to the very bottom and right-click Workflow History


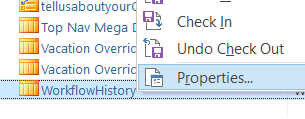
  5. Select Properties from the right-click menu
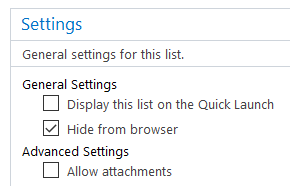
  6. Un-check “Hide from Browser” which will be checked.


  7. Now Save.  I prefer the option to Save via the blue File tab in the upper left of SharePoint Designer 2013. 
  8. Open your browser and navigate to the Site Contents page of your site collection. 

Your Workflow History folder will now be available in Site Contents. 

One caveat: the Workflow History list is the default location for storing workflow history, but can easily be changed in SharePoint Designer. It’s a big extra step but an important one to double-check each workflow’s history storage location when you have SharePoint Designer 2013 open. 

Export Search Results for entire Office365 tenant to CSV

I needed to perform a search of our entire tenant for a few key terms and then produce a CSV of all the search results. I was not able to find anything on the web which produced this result. The best thing I could find was a PowerShell script for searching a single site collection but we have over 6000 site collections.

A resource at Microsoft provided this excellent script and I’m now sharing it with all of you. Enjoy!

Notes:
1. You will want to edit lines 6 and 7 with your tenant URL and your desired search terms.
2. If you are using Multifactor Authentication (MFA), you will need to comment line 15 and un-comment line 16. This article explains what’s going on here.
3. Read the notes in the comments before lines 22 and 23 regarding the -All and -MaxResults parameters.

# This script executes a search against the SPO search engine and exports
# the results to a CSV file.  The exported CSV file will be added to the same 
# Directory as the script

# Script Input Parameters   
$url = "https://tenantname.sharepoint.com/"  
$keyword = "SSN"  
$currentTime = $(get-date).ToString("yyyyMMddHHmmss");  
$outputFilePath = ".\SearchResults-"+$currentTime+".csv"  
$credentials = Get-Credential 
 
## Connect to SharePoint Online site  
# However, if you're using Multifactor Authentication (MFA), you'll want to comment out this next line
# and un-comment the line with the -UseWebLogin parameter
Connect-PnPOnline -Url $url -Credentials $credentials  
#Connect-PnPOnline -Url $url -UseWebLogin  
 
# Executes an arbitrary search query against the SPO search index  
# Note below the option of using -MaxResults to limite the number of rows returned.  This line is currently commented out
# The other option is to use the -All parameter to return all results, this line is currently active.
# Make sure only one of these two lines are active.
# $results = Submit-PnPSearchQuery -Query $keyword -MaxResults 10  
$results = Submit-PnPSearchQuery -Query $keyword -All
 
## Add each row of the search result to the hash table  
$hashTable=@()  
foreach($resultRow in $results.ResultRows)  
{  
    $obj=New-Object PSObject  
    $resultRow.GetEnumerator()| ForEach-Object{ $obj | Add-Member Noteproperty $_.Key $_.Value}  
    $hashTable+=$obj;  
    $obj=$null;  
}  
 
## Export content of hashtable to CSV  
$hashtable | export-csv $outputFilePath -NoTypeInformation  
 
## Disconnect the context  
Disconnect-PnPOnline  

Hide “Download” option on documents right-click menu

Do you want to prevent people from downloading a copy of a document or spreadsheet from SharePoint? I’ve shown you previously how to hide the Download to Excel button in the ribbon. This is the next step in the evolution of keeping your users dialed back.

Hover over any document or spreadsheet for an elipsis (three little dots) that you can click on for more options.  “Download” is a standard menu item.

Download-menu-item

Using F12, I figured out the id for this section of code and then I wrote a super short script that will hide it for you.

To implement: just put the following code into a Content Editor Web Part (CEWP) on the page in the Edit Source section.

<style type="text/css">
#ID_DownloadACopy
{
display:none;
}
</style>

Remove Left-Hand Nav on a List Form

Today I was asked to remove the left-hand navigation on the New Item form for a list in Office365. The form was opening in full-page mode, rather than the “modal dialog” format (aka “LightBox”) and was showing the site navigation on the left. The site owner did not want this.

This should also work on any other type of SharePoint page where you want to hide the left nav.

So I found this video which provided this excellent CSS code:

<style type="text/css">
/*      removes navigation content      */
#sideNavBox
{
display: none !important; 
width: 0px !important; 
margin: 0px !important;
}
/*      removes white space      */
#contentBox
{
margin-left: 0px !important;
}
</style>

Two important things to point out:
1. You’ll need to add a Content Editor Web Part (CEWP) to the form page. Edit the web part, then select Edit Source from the ribbon, and paste in the code there.

Edit Source button from the Ribbon
Make sure to use the Edit Source feature

2. If you cannot edit the form page, append ?ToolPaneView=2 to the URL, which I wrote about previously.


Adjust / Modify Column Width in an Office365 List

Previously, I wrote about how to adjust the column width of a list in SharePoint 2010. However, none of that advice works in SharePoint Online. There is a ton of crazy information out on the web and most all of it is useless. I found this one suggestion by Vadivelu B. on a Microsoft forum to be just what I needed.

I suggest saving the below code to a text file, putting that text file in your site collection SiteAssets folder, and then it will be available for you to simply call from a Content Editor Web Part (CEWP) that you add to any list page.

For this code, DisplayName is the column name. In the below example, this script sets the Comments column to 400 px. So obviously edit it for your situation.

<style type='text/css'>
.ms-vh-div[DisplayName='Comments']
{
width: 400px;
}
</style>

Page 2 of 3

Powered by WordPress & Theme by Anders Norén