A chronicle of issues encountered in SharePoint

Category: SharePoint 2010 Page 1 of 5

Microsoft SharePoint 2010

Clever Techniques for Dealing with Folder Sprawl

I cannot count the number of clients I’ve encountered who have treated the default document library on a SharePoint site as the *only* document library they could use.  So they filled it up with folders, then sub-folders, then sub-sub-folders, etc.  It makes for a difficult conversation.  I usually say “let’s take ALL of the top-level folders and make them each their own document library!”  And then they say “No” because they’ve gotten used to it like this.  And by “this” I mean sprawled and unmanageable, generally.

So if you’ve got sites that have folder sprawl, this article from Veronique Palmer will give your users a little help figuring out how many sub-folders are beneath your top-level folders, and how many items they contain.  It’s a start.  And it’s helpful.

One last piece of advice: if your organization manually provisions sites for users, delete the default “Documents” document library and during the provisioning process, ask your users to think about how many document libraries they’ll probably need going forward.  Get them to provide meaningful document library names.  And then create them for them.

Repair Broken Links Before or After a SharePoint Migration

Today I found two tools from LinkTek that I want to share.  First, the free one.  LinkReporter is a free tool that reports on broken links throughout your IT enterprise.  I suggest you run it and then decide to either fix the links manually or use a paid product to fix them for you.

The second tool is LinkFixer Advanced which runs against SharePoint on-premise, Microsoft 365, Box, OneDrive, DropBox, and regular file servers.  It is an enterprise-wide application that appears to run against any of these platforms so it’s not specific to SharePoint at all.

For SharePoint-specific migrations, they offer a page which goes into more detail: LinkFixer Advanced for SharePoint.  This could be the tool that saves your job or your sanity.

When Edit Page is Not Available

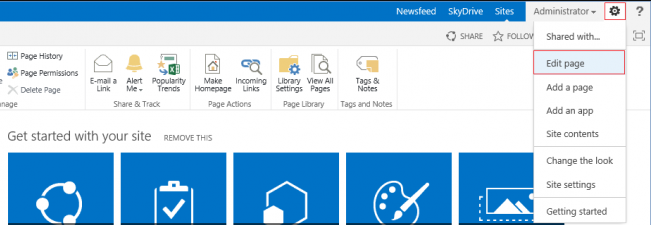
Edit Page

Sometimes this option is missing.

To edit a page in SharePoint 2013 that does not have Edit Page menu option available (pictured above), such as the Access Requests page, append the following bold text to the url (start with and include the ?):

http://SharePoint/sites/YourSite/Access%20Requests/pendingreq.aspx?ToolPaneView=2

For my little task, I actually used the following url:

http://SharePoint/sites/YourSite/Access%20Requests/pendingreq.aspx?ToolPaneView=2&pageview=personal

I added the part about the pageview=personal because I was putting in some suspect CSS in a Script Editor web part and I didn’t want to bring down the house, so I was just working with my personal view of this page.  However, you can go with pageview=shared or omit the pageview parameter altogether (and take your chances).

This brief article today simply expounds on a previous post I made in August, 2016 about this subject.

A Web Part you attempted to change is either invalid or has been removed by another user

I encountered the following error today in our SharePoint 2013 environment while simply trying to move a web part to another web part zone:

A Web Part you attempted to change is either invalid or has been removed by another user

Of course, I went to Google first and found several articles on the subject, none of which fixed the problem. Then I found out from the SQL DBA that the SQL transaction logs had filled up the drive on the SQL Server.  After the transaction logs were backed up and shrank, the error has gone away.

So add “check to see if you’re out of disk space on SQL” to the various remedies you pursue to resolve this issue.  It worked for us.

<sarcasm>And thanks to Microsoft for such a helpful error message.  </sarcasm>

Helpful SharePoint URL reference

I’ve often used the Web Parts Maintenance page in working with SharePoint sites.  To get there, simply add ?Contents=1 to the end of the URL. My other favorite “quick link” is for opening a page in Edit Mode when I cannot otherwise.  This is achieved by adding ?ToolPaneView=2 to the end of the URL.

Ahmed Farag has posted a very helpful blog article on MSDN back in 2013 with quite a few of these helpful URL add-ons.  It’s still relevant today.  We should probably all bookmark the page.

https://blogs.msdn.microsoft.com/how24/2013/05/23/famous-sharepoint-urls-locations/


PowerShell Command Builder for SharePoint

In case you weren’t aware, Microsoft has provided a free, online PowerShell Command Builder utility:

https://www.microsoft.com/resources/TechNet/en-us/Office/media/WindowsPowerShell/WindowsPowerShellCommandBuilder.html

I recommend that you bookmark it and refer to it whenever you need to double-check the commands in your scripts.  You may want to download the Getting Started Guide.

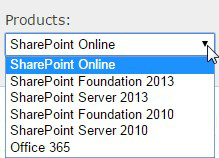
Make sure that the first thing you do is to select the appropriate version of SharePoint from the Products dropdown.

Windows PowerShell Command Builder for SharePoint 2013 Products and Office 365

The rest is pretty straightforward.

Enjoy.

Render Tableau charts in SharePoint

Now that you’ve created a brilliant chart, graph or dashboard in Tableau you want to render it on a SharePoint site.  Here are the steps to do this.  Honestly, the step you’re probably not thinking about is Step 1 below.  If you’re working with the Tableau client on your desktop, you can make awesome interactive graphs but for everyone to see it, it needs to be published correctly to the Tableau server and make sure that the permissions are properly set.

Step 1: Publish your work to a Tableau publishing server.

Step 2: Open your browser and navigate to the Tableau server, find your work, and select it.

Step 3: Now click the Share link in the top right of your work, as highlighted below.

Share

Step 4: A dropdown will reveal an Embed Code script and a Link.  Highlight and copy the Embed Code script.

Step 5: Now open Notepad and paste in this code.  Save it and give it a name. Make sure to keep the .txt extension and avoid using spaces.  Use hyphens or underscores instead.

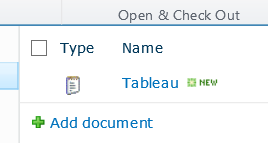
Step 6: Upload this text file to the SharePoint site where you want to render this graphic.  I named my Tableau in the below screenshot.

Text-file-in-library

Step 7: Select the file and open it in your browser.  It should actually render and should look great.

Step 8: Now Select and Copy the entire url from the browser.

Step 9: Navigate to the page where you want the graphic to render.

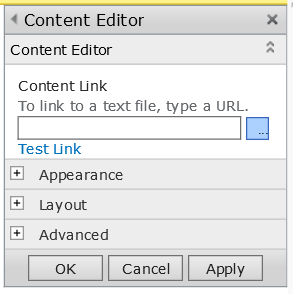
Step 10: Add a Content Editor Web Part where you want the graphic to appear and paste in the url for the Content Link section.

CEWP

Step 11: Click OK on the Content Editor Web Part.

Step 12: Save and Close the page.

Success!

Connect Tableau to one or more SharePoint lists

If you are using Tableau for reporting, you may want to connect to one or more lists in SharePoint.  Here are the steps I take to do this.

Step 1: Open a browser and navigate to the SharePoint list you would like to work with in Tableau.  Make a point to identify the list name.

Step 2: Now backspace over the url to just the site url and the trailing forward slash.

For example, if the list is at http://sharepoint/site/Lists/listname/allitems.aspx then backspace to http://sharepoint/site/

Step 3: Now add the following to the url:  _vti_bin/ListData.svc

The url should now read: http://sharepoint/site/_vti_bin/ListData.svc

Step 4: Press Enter.  Select and copy this url to the clipboard.

Step 5: In the resulting XML file, find the list name of your list.  It may be slightly different than the list name on the actual list but it will be close.  For example, a list called Monitoring Activity may render in the XML file as MonitoringActivity.

Step 6: Open Tableau Desktop and select Connect to Data

Connect-to-data

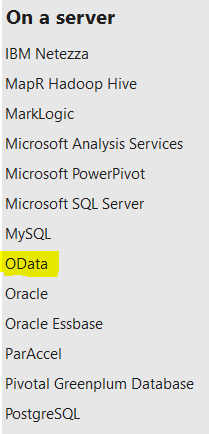
Step 7: On the Connect to Data page, select OData

Connect to OData


Now we’re going to put it all together.


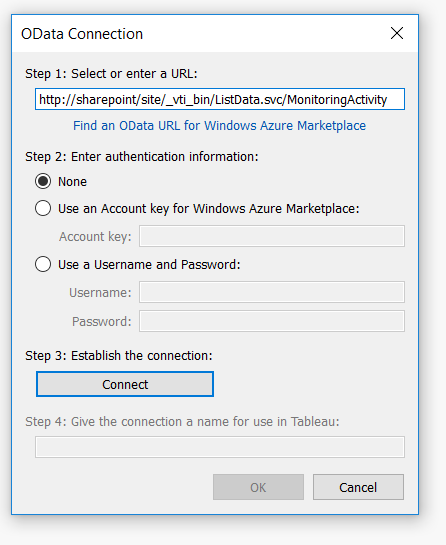
Step 8: In the OData Connection dialog box, paste in the url from the clipboard, then add a forward slash, then copy and paste in the List name from the XML file.

Quick explanation: We’re using the SharePoint REST service here and it is case-sensitive. Hence, be very exact with the list name.

For example: http://sharepoint/site/_vti_bin/ListData.svc/MonitoringActivity

Connect-OData

Step 9: Keep the default Authentication set to None and click the Connect button.  It will assign you a connection name.  Feel free to change it.

Step 10: Click the OK button

Success!


Determine Who Last Modified an InfoPath Form in SharePoint

There are articles on Google that help you add a field to an InfoPath form so that you can display who last modified it.  Great.  However, I needed to find out who had last edited (and thoroughly screwed up) an InfoPath form on a specific list in our SharePoint 2010 environment.   It takes a little digging.

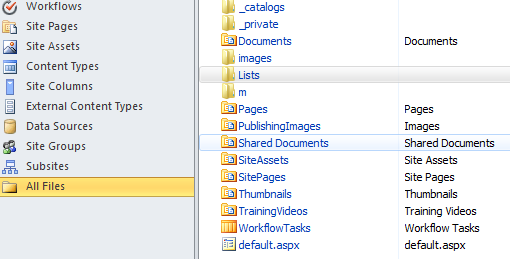
First of all, you’re going to need to use SharePoint Designer 2010.   Open SPDesigner and navigate to your site.  Now select All Files at the bottom of the left navigation menu.  Then select Lists in the right-hand pane.  (Shown below)

Note: If you cannot see the All Files menu item as shown below, read this previous article.

SPDesigner-All-Files-Lists

Once you’ve selected Lists from the right pane, select your list.  It will take you to a screen that I find misleading.

InfoPath-List-modified

Note that the dates are way off.  I just made a change a few minutes ago and it’s not reflected here at all.  This information is three years old.  So ignore the findings on this page.

To dig deeper, click on the directory here NOT named Attachments. In this case the other list is Announcement, although yours will be different.

InfoPath-List-modified-correct

You should now see several .aspx files and one template.xsn.  The information on this page in the columns for Modified Date and Modified By are what you’ve been looking for.   Enjoy.

SharePoint Designer 2010 “All Files” is Missing / Not Showing on Menu

I keep SharePoint Designer disabled ever since one malicious user caused a great deal of trouble two years ago.  We have over 15,000 users and the risk is just too great.  As you probably know, SharePoint Designer is enabled/disabled at the web application level and then at the site collection level (for some degree of granularity).  To keep life simple, I keep it disabled at the web app level and then selectively (and briefly) enable it when a user needs to make a change.  But first, they have to show me what they’ve done in the Test environment, where SPDesigner is fully enabled all the time.  If you demonstrate capability in Test, you get a window of time to do your magic in Production.  Let’s call this: Doug’s Very Effective SharePoint Designer Methodology.

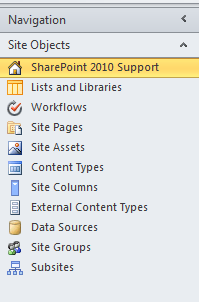
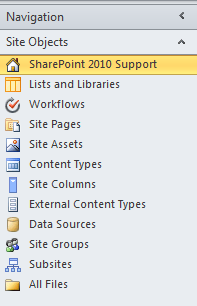
Now to solve the issue at hand.  I had a need to enable SPDesigner at the web app level for a user.  The problem was that they could not see the All Files menu item that usually appears on the left menu.  You’ll notice that below Subsites in the menu below that it is blank where All Files should render.

SharePoint-Designer-2010-All-Files-Missing

The problem was caused by my laziness – I had simply selected the checkbox for Enable SharePoint Designer.

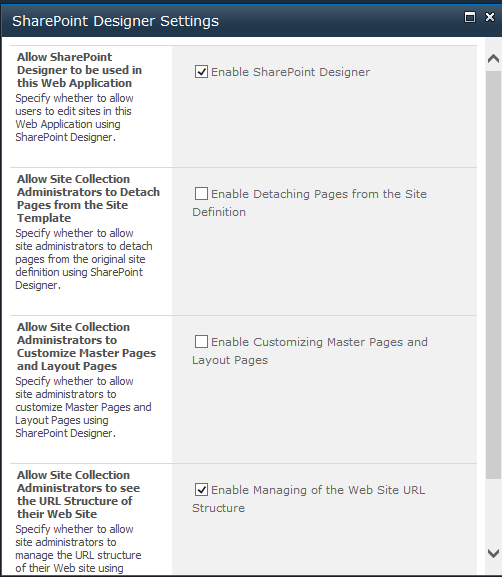
The solution is simple: when you enable SPDesigner at the web app level (by selecting the first checkbox to Enable SharePoint Designer), if you want the user to see the All Files menu item, make sure to also check the checkbox for Enable Managing of the Web Site URL Structure, as shown below.

SharePoint-Designer-WebApp-Settings

Then your menu should look like this, with the All Files menu item below Subsites.

SharePoint-Designer-2010-All-Files

Page 1 of 5

Powered by WordPress & Theme by Anders Norén