A chronicle of issues encountered in SharePoint

Author: Doug Page 5 of 8

SharePoint Constantly Prompts for Credentials

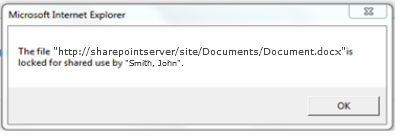
Some of our users are prompted for their username and password every time they visit sites in SharePoint.  It’s especially annoying if they’re logged in and attempt to navigate to another site, where they are prompted again and again.  The question has come up: “Why can’t SharePoint remember my username and password from one minute to the next?!?”

The answer is: it’s not SharePoint.  The culprit may be your browser settings and if so, the solution is two simple settings changes.  But first, an explanation.

If you’re using Windows authentication then this should be simple.  Your users have already “authenticated” into Windows when they logged into their machines.  If these same credentials are used for SharePoint, we simply need to tell your browser to pass along these credentials to SharePoint.  Otherwise, your browser will prompt for them each time.  Sound familiar?

I’m going to provide the settings for Internet Explorer in this article.  This solution should work for Chrome and Firefox as well since the Internet Settings apply to all three.  I’ll provide a general description of the solution here below.  Detailed instructions will follow these general instructions at the end (via a link).

Step 1
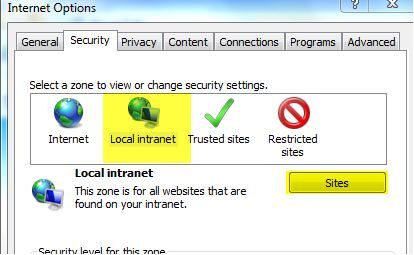
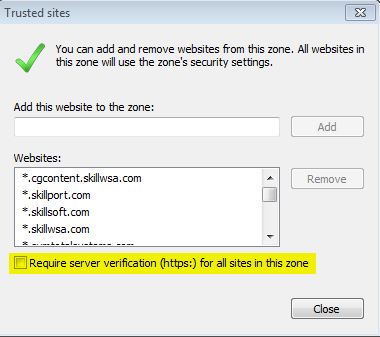
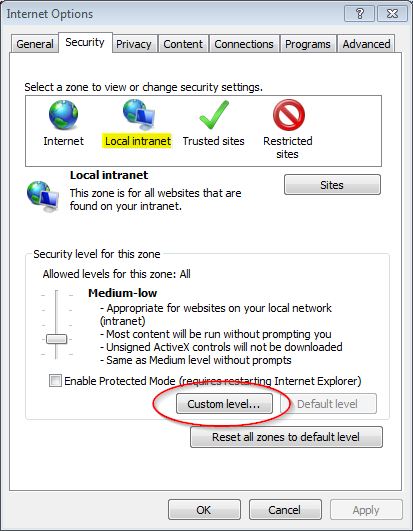
I recommend listing your SharePoint top-level domain in the Local Intranet zone in IE.  Some folks like to put their SharePoint domain in Trusted Sites and that will work too.  I’ve heard arguments on both sides so pick your poison.  But at least pick one of them.  Like I said, I recommend the Local Intranet zone.

Step 2
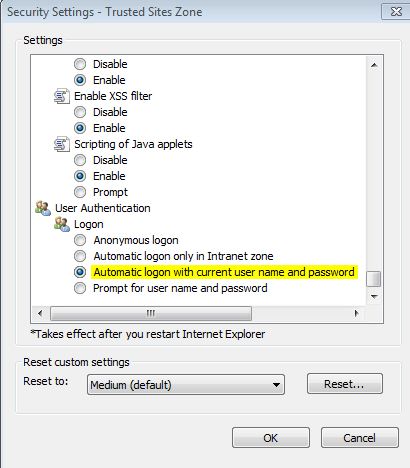
Once you’ve added your SharePoint top-level domain to the Local Intranet zone, update the zone Security Settings to automatically pass the user’s Windows credentials on to sites in this zone.

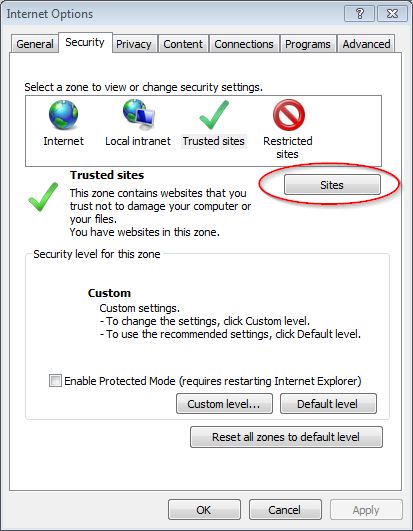
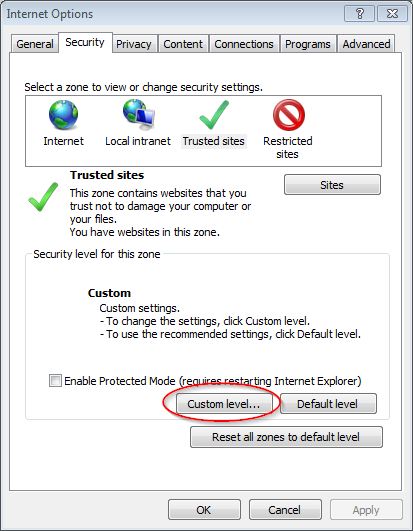
Microsoft has really pulled a fast one here.  The zone-specific Security Settings are accessed by clicking a button mislabeled as “Custom level…” for some reason.  See screenshot below.  The window that comes up, however, is correctly labeled Security Settings and specifies the zone selected.

Internet-Options-Custom-Level

Detailed instructions for this process are available as Steps 4 and 5 on this article previously published here on this site.

I hope this helps your users break free from the prompts!

Access Denied for users with proper permissions

If you have encountered an Access Denied message in SharePoint although you have proper permissions to the site, page, list, or library, then it could be one of several reasons. Hopefully one of these several fixes will work for you.

Access Denied

Fix #1:

For the site or sub-site with the Publishing feature enabled, ensure all users have read access to the master page library.
Site Actions > Site Settings > Master pages and page layouts > Library tab > Library Permissions > Grant Permissions button. Add Authenticated Users with Read permission level as in the screenshot below.

Add-All-Authenticated-Users-to-SharePoint

Fix #2:

If you experience Access Denied on file upload or download, it may be your anti-virus settings.

The following folders may have to be excluded from antivirus scanning when you use file-level antivirus software in SharePoint. If these folders are not excluded, you may see unexpected behavior. For example, you may receive “access denied” error messages when files are uploaded.

  • Drive:\Program Files\Microsoft Office Servers\14.0\Data
    (This folder is used for the indexing process. If the Index files are configured to be located in a different folder, you also have to exclude that location.)
  • Drive:\Program Files\Microsoft Office Servers\14.0\Logs
  • Drive:\Program Files\Microsoft Office Servers\14.0\Bin
  • Drive:\Program Files\Microsoft Office Servers\14.0\Synchronization Service

Reference Links:

http://support.microsoft.com/kb/952167

http://www.symantec.com/business/support/index?page=content&id=TECH141492

http://blogs.msdn.com/b/chaun/archive/2013/08/01/do-we-really-need-to-set-antivirus-exclusions-up-for-our-sharepoint-servers.aspx

Thanks to Ripon Kundu for contributing to this section.

Fix #3:

You may also experience an Access Denied while uploading a file to a site that utilizes the Content Organizer feature  *and*  the site’s Drop Off Library has unique permissions.

The resolution is to make sure that users have Contribute access to a site’s Drop Off Library” per this article.

This solution, you may notice, bears a strong resemblance to Fix #1.  The takeaway here is to really mind your permissions.

Hide Column Headers in Webparts

A user posted a List View Web Part on their intranet site alongside their Announcements (also a List View Web Part).  For a cleaner look, I was asked if we could get rid of the column headers for all of the web parts on the page.  They aren’t really useful, they state the obvious, and they take up valuable real estate on the site.  So let’s get rid of them.

Hide Column Headers

Before – Notice the Column Headers ‘Title’ and ‘Modified’

*** Click the images to view them full-size ***

Hide Column Headers

After – Notice the Headers are now gone


It took a little while via Google to find the solution which was:
A.) not selected as an answer, and
B.) all the way at the bottom.

So I’ll make it quick and easy for you.

  1. Open Notepad
  2. Paste in the following code:
    <style>
    .ms-viewheadertr { display: none;}
    </style>
    
  3. Save it as Hide-Column-Headers.txt
  4. Upload the file to a doclib on your site or in your site collection
  5. Copy the path to the file and the filename, i.e. /sitecollection/site/doclib/Hide-Column-Headers.txt
  6. Go to the page where you want to hide the web part headers and create a new Content Editor Web Part (CEWP)
  7. Paste in the link to the file including the path
  8. In the Appearance tab I changed the Title to “Hide Column Headers” and changed the Chrome type to “None”.  Otherwise it will show on the page and confuse the users.
    CEWP Settings
  9. Click Ok in the Content Editor Web Part (CEWP)
  10. Save and Stop Editing the page

Success!  Now all of the List View web parts on the page will render without the unnecessary column headers.

The file {filename} is locked for shared use by {user}

the-file-is-locked-for-shared-use

SharePoint-the-file-is-locked-for-shared-use

If you have seen either of the above messages while trying to open a document in SharePoint, you are probably as confused as we were.  My user was getting this even though the file was not checked out.  Worse still, the message said that the file was locked out… by him.  He didn’t have it open and there were no “orphaned” processes of Winword.exe running in Task Manager.  So how could this be?

When I Googled this error, I came upon a ridiculously weak thread on TechNet that basically says it’s designed that way and that you have to wait for 10 minutes for the lock to clear.  Nonsense!

Resolution

The culprit in our case was Credential Manager, which may be accessed via Control Panel.  Simply select the entry for the web application URL in Credential Manager and delete it by selecting “remove from vault“.

For step-by-step instructions on how to do this (including screenshots), follow the post Step 2: Clear Your Cache in Credential Manager from a few months back.

Productivity Hub Silverlight Slider Preview Images Do Not Display

First, an introduction to the Productivity Hub for SharePoint 2010:

Microsoft has developed the Productivity Hub to help support your ongoing end user training efforts.

The Hub is a SharePoint Server site collection that serves as a learning community and is fully customizable. It provides a central place for your training efforts, and includes training content from Microsoft’s core products.


The Problem

On the main page there is a nifty Slider Silverlight Web Part that allows users to scroll through preview thumbnails of the various videos available.  It’s very cool.  There’s also a slider on the Videos page.  We had the problem recently where the slider on the Videos page was not rendering the preview thumbnails, as seen in the screenshot below.

Productivity Hub Slider Silverlight Web Part

Clicking the failing-to-load image did correctly launch the appropriate video so that functionality was fine – it was simply that the thumbnails were not showing.  They are located in Site Assets / Video Thumbnails folder.

You can find the files listed below.  They are named in such a way that it is easy to identify which file is used as a thumbnail for which video.

Video Thumb-Excel.jpg
Video Thumb-InfoPath.jpg
Video Thumb-OneNote.jpg
Video Thumb-Outlook.jpg
Video Thumb-PowerPoint.jpg
Video Thumb-Word.jpg

For these files to not show there are two possible scenarios:
those files are either missing -or- they are corrupt.

In our case they were corrupt. We came to this conclusion because we were not able to download these image files. ( It was throwing a download error stating that the file was corrupt).

The Solution

How these files became corrupt is a mystery.  As you might be aware SharePoint does not give the user the privilege to edit image files directly, so we’ll just have to replace them.

First, we have to go get the image files.  Open the following site in your browser http://www.spsdemo.com/sites/productivity/. Get the images from here.

Then, simply upload and overwrite the corrupt images -or- delete the old corrupt images from the library and then replace them with the good ones.

Either way: problem solved.

Productivity-Hub-Video-Previews

SharePoint Prompts for Credentials Three Times Followed by a Blank White Page

Several of my users have encountered the problem of three failed login attempts to SharePoint resulting in a blank white screen.  This can happen when a user’s  login credentials (username and password) are incorrect.  Unfortunately, this can also happen when they put in their correct information.  This second scenario can be bedeviling so I’ll go over the various tasks you can perform to resolve this problem:

1.  Clear your browser cache and restart your browser
2.  Clear your cache in Credential Manager
3.  Alternate way to clear your cached credentials
4.  Add site to Trusted Sites
5.  Pass along current credentials to IE

**Please also note the addendum regarding prompts for a mapped drive to a SharePoint site.


1.  Clear Your Browser Cache and Restart Your Browser

Perhaps the easiest and most well known, you’ve probably already tried this step.  If you have not, Google the steps and perform them, then restart IE.

2.  Clear Your Cache in Credential Manager

  1. Close any open browser windows
  2. Open Control Panel.
  3. On the upper right side of Control Panel, change the View by: dropdown selection from Category (shown below) to either Large Icons or Small Icons.  Pick either one.
    Category-Control Panel
  4. In Control Panel, open Credential Manager.
    Credential_Manager
  5. In Credential Manager, select the URL that is not authenticating properly.  It will expand the entry.
  6.  Select Remove from vault
    remove-from-vault
  7.  Select Yes to the warning message that follows
  8. Close Credential Manager
  9. Open your browser and try to connect again

Alternatively, if you have WinXP you will not have Credential Manager – you will have Stored Usernames and Passwords instead.  This site will guide you on how to clear this system cache in WinXP.


3. Alternate Way to Clear Your Cached Credentials

  1. Close any open browser windows
  2. On the Run line, type (or copy and paste) the following:
    rundll32.exe keymgr.dll, KRShowKeyMgr

    Stored-user-names-and-passwords

  3. Click OK
  4. Select the credential you need to clear and then click the Remove button
  5. Click the Close button
  6. Open your browser and try to connect again

Source: Windows IT Pro website


4.  Add Site to Security Zone

Internet Explorer lets you categorize websites into different zones with different security policies for each zone. Be default, sites are all categorized as Internet.   We will look at two different types of site: Intranet and Trusted Site.

Intranet sites

If you are on a company Intranet site you should add the url to your list of sites in your Intranet zone.

  1. In Internet Explorer, open Internet Options
  2. Select the Security tab
  3. Select the Local Intranet icon
  4. Click the Sites button
    Local Intranet
  5. If the site does not use the https protocol, then un-check the checkbox for:
    Require server verification (https:) for all sites in this zone.
    require-server-verification
  6. Paste or type in the url of the site into the input box, then select the Add button
  7. Click Close
  8. Click Ok
  9. Close your browser
  10. Open your browser and try to connect again


Trusted Sites

If you are experiencing trouble authenticating to an Internet site that you regularly visit (and that you trust) you should add it to your Trusted Sites zone.


  1. In Internet Explorer, open Internet Options
  2. Select the Security tab
  3. Select the Trusted Sites icon
  4. Click the Sites button (as shown below)
    Internet Options
  5. If the site does not use the https protocol, then un-check the checkbox for:
    Require server verification (https:) for all sites in this zone.
    require-server-verification
  6. Paste or type in the url of the site into the input box, then select the Add button
  7. Click Close
  8. Click Ok
  9. Close your browser
  10. Open your browser and try to connect again


5.  Pass Along Current Credentials to IE

  1. In Internet Explorer, open Internet Options
  2. Select the Security tab
  3. Select the Custom Level button at the bottom
    Custom-level
  4. Scroll all the way to the bottom of this window
  5. In the User Authentication section, select:
    Automatic logon with current user name and password
    automatic-logon
  6. Click OK
  7. Click OK
  8. Close your browser
  9. Open your browser and try to connect again


**Addendum Regarding Mapped Drive to a SharePoint Site

You’ll want to configure Internet Explorer for automatic logon with current user name and password as above.  However, you’ll also need to edit your registry to tell Windows to allow the webclient service to remember passwords.

  1. Open Registry Editor (RegEdit)
  2. Navigate to this registry key: HKEY_LOCAL_MACHINE\SYSTEM\CurrentControlSet\Services\WebClient\Parameters
  3. Click Edit > New > Multi-String Value and enter the name:
    AuthForwardServerList
  4. For the Value enter the URL of the sharepoint site
  5. Close RegEdit
  6. In Services, restart the WebClient service.

Source:  http://tipsyouforgot.blogspot.com/2010/06/remember-password-setting-not-working.html


Redirect a SharePoint site

Recently, we needed to redirect users from a site in SharePoint to another site.  First, we set the old site to Read-Only. How? Navigate to {Central Administration Site |Application Management | Configure Quotas and Locks} and select one of the options under “Site Lock Information“.

We then copied all of the content, and sent out a message to the users affected about the new site location.  For those who did not get the e-mail, we wanted to redirect traffic to the new site along with an explanatory message.  We went with “the simple way” below but if you feel like showing off, go with the second option.

1. The Simple Way

This tutorial by Devin Walker fits the bill.  It uses the JavaScript Alert box which provides for a message and an OK button.  We chose to use a Confirm box instead in order to allow a choice for users to either stay on the Read-Only site or go to the new site.

Here is the code we used:

<script type=”text/javascript”>// <![CDATA[
 var cnf=confirm("XYZ site has been migrated, and this site is now Read-only. \n\nClick Ok to navigate to the new, migrated site or Cancel to remain on this Read-only site.");
 if(cnf)
 {
 location.href="http://sharepointserver/sites/XYZ/";
 }
 // ]]></script>

To Implement
Use a Content Editor Web Part (CEWP) and paste in the above code, modified with your message and your new site url in the location.href statement.  That’s it.

2. A Better Way

The above provides a simple, old school (some would say “archaic”) redirect script and message.  If you’re like me, sometimes you like to be fancy and modern.  In this case, implement this nifty script instead to alert users and redirect them to the appropriate sites.

To Implement
Download the zip file from the website, unzip the files, and upload them to your Site Assets document library (or a folder there created for this purpose).

Then, install a Content Editor Web Part (CEWP) on the target page and proceed as above, edited for your environment and the path to your Site Assets document library.

Adjust / Modify a Column Width in a List

Today I implemented an Issue Tracking list in SharePoint 2010 for a project.  As the users started using it, I noticed that the Title column was narrow, hence the longer titles were wrapping to several lines.  This does not look good at all.

So I went to Google and set out to modify the column width of my list.  I found this post by someone named Aanu but was disappointed that it didn’t work.  As is often the case, I read further down into the comments and found a gem from a user named George: we needed to add one more parameter to the style information.  Now it works just fine.  Here is the process in one neat, concise explanation.

Open the site in SharePoint Designer 2010, then navigate to Lists and Libraries, then select the desired list.  In my case it was Issues.

SharePoint-Designer-2010-Lists-and-Libraries

Select the List, then select the desired view.  In my case it is “All Issues”.  Views are located in the upper right.

Now select the column you want to edit.  Follow Aanu’s post about editing both the <th> and <td> sections by performing these three actions:

  1. Delete nowrap=”nowrap”
  2. Change the width to your desired width.
  3. Add parameters in the “style” code for overflow and white-space.

Now, follow George’s suggestion to perform a fourth action:

4.  Add a parameter for min-width in the style code as well.


Your code should look like the below images.

**Click to open them full-size.**

Modify-list-column-width-in-SharePoint-2010

TH code


Modify-list-column-width-in-SharePoint-2010-td

TD code

Unable to Create a New Document Library or List on a site

Today a site owner wanted to create a document library on his site that had been migrated from MOSS 2007 to SharePoint 2010.  He attempted to create the doc library several ways, none of which worked:

  • Site Actions, New Document Library
  • Site Actions, More Actions
  • Libaries, Create

The problem turned out to be a Site Feature that was not activated.  To resolve this issue, I went into Site Actions, Site Settings.  Under Site Actions, select Manage site features.

Manage-site-features

Scroll down to Team Collaboration Lists and activate this feature.


Team-Collaboration-Lists


You should now be able to add Lists and Document Libraries to your site.


Display Name will not Update

I had a user who got married and submitted her name change to the company.  Active Directory was properly updated.  Her old last name (Smith) does not appear anywhere in her AD record and has been replaced with her new last name (Jones).   We have SharePoint 2010 set to perform an AD sync every night.  For some reason, in SharePoint her name continues to show the old last name (Smith).

Attempt to Resolve
We used PowerShell to determine where all she had privileges and it was in only two groups: Member of one group, Visitor in another. So we removed her account in SharePoint via PowerShell.  Then, when I went to manually add her back to the two groups, I used the PeoplePicker to find her.  She was there correctly (Jones).  So I selected her, then Add, only to find her display name incorrectly rendering as Smith.   Since AD is correct it has to be SharePoint caching this somewhere, I reasoned.

Solution
To make this quick, the user at this forum thread had the exact same problem.  After much back and forth, this is the correct solution submitted by one Mayur Joshi:

Let’s do this, hit the below URL 

http://{SiteCollectionURL}/_layouts/people.aspx?MembershipGroupId=0

Look for the user that has old name, select the checkbox, click on Actions -> Delete User From Site Collection. 

Make sure to note the parameter of MembershipGroudId=0.  (That’s a “zero”, by the way.)

Happily, this solution resolved the issue for us.  Thank you Mayur… and Google.

Page 5 of 8

Powered by WordPress & Theme by Anders Norén