A chronicle of issues encountered in SharePoint

Category: SharePoint 2010 Page 4 of 5

Microsoft SharePoint 2010

SharePoint 101: Restore a Deleted Web Part

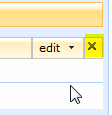
Actually, the title here is misleading.  Let me explain: when a user clicks the X in the upper right corner of a web part (while editing the page) it does not actually delete the web part.  Rather it is “closed”.  There’s actually a big difference between a deleted and a closed web part.

Close_web_part

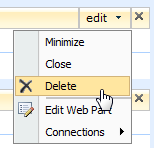
However, if a user selects the web part edit menu and then Delete (as below), then the web part is actually deleted.  You will need to start from scratch or restore the site from backup.

Delete_web_part

If the web part was simply closed rather than deleted, you can restore it, as long as you know where to look.   Simply put, it’s in the Closed Web Parts category.

Here’s how to get your closed web part back:

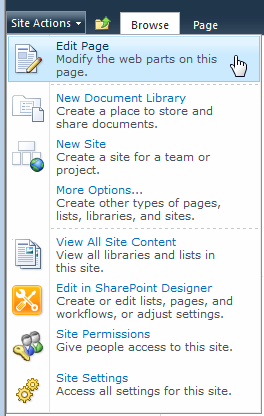
1.  Navigate to the page where the web part was closed.  Edit the page.

Edit_Page_2010

2.  Add a Web Part, preferably where it was previously.

Add_web_part


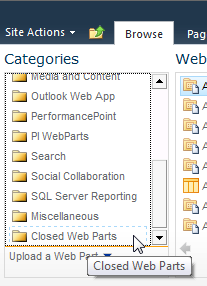
3.  Scroll down the list of Categories to Closed Web Parts.  In my list below it’s the very last selection.

Closed_web_parts

4.  Select the Closed Web Parts category and a list of web parts that have been deleted will appear in the right pane.

5.  Select the one you want and then click the Add button in the lower right of the web part window.

Add_web_part_button

Your web part should now be restored.

Navigation link missing in Site Settings, Look and Feel

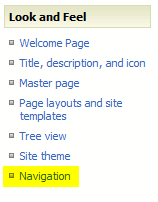
I ran into the problem last week where the Navigation link was missing from Site Actions, Site Settings, Look and Feel.  To resolve this problem: turn on Publishing.

1.  In Site collection features, you’ll want to activate SharePoint Server Publishing Infrastructure.

Site Collection Features

2.  You will also want to turn on Publishing at the site level.  In Manage site features you will want to activate SharePoint Server Publishing.

Site Features - Publishing

Now your Navigation link will be available.

Site Settings - Navigation link


Addendum: This is a fine approach if you have only a small number of sites where you want to enable publishing.  However, if you have many sites you should use PowerShell.  See this article on TechNet for the script.

List Settings is Missing in Site Permissions

In the previous post, I pointed out that in order to change the view in SharePoint 2010 permissions, you have to go into the List Settings.  You can create or edit the Views there.  However, sometimes the List Settings option is missing.  In this case, the page is there… there’s just not a link for it.  You can get to it but there’s one catch: you need to know the list GUID.  Here is the process to get to the hidden List Settings page.

  1. Determine the list GUID.  To do this, hover over any user’s name in the list of permissions.  You’ll see one of the parameters being passed is the ListID.  This is the GUID for the list.  Right-click the user’s name and select Copy Shortcut.  Open Notepad and paste in the url.  Now simply copy (or cut) everything after &ListId=.  For example, &ListId={3B3CB469-29F0-456D-BF3F-E0D0F1E645F8}&ID=1740
  2. Navigate to the List Edit page with the GUID parameter.  In permissions, you are already in <path>\_layouts\people.aspx?<GroupID>.  Keeping the same path including the _layouts folder, now key in after _layouts\ (replacing people.aspx and everything after) with ListEdit.aspx?&List=<GUID>.  For example, http://sharepoint/_Layouts/listedit.aspx?&List={3B3CB469-29F0-456D-BF3F-E0D0F1E645F8}&ID=174l


Key Points to Consider (Troubleshooting)

  1. You should paste in the GUID from step one rather than type it.
  2. Note that in the original url the parameter was ListId but the ListEdit.aspx page requires the List parameter.  This is an important distinction.
  3. Also notice that you should include the squiggly brackets and the ID parameter at the end as well.


Cannot Modify a View in Permissions: People and Groups

I’ve had a few users reach out to me that they wanted to see additional columns in either of the two views (Detail and List) available to them in Permissions, People and Groups, <PermissionGroup>.

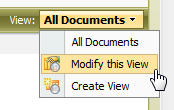
We are used to seeing Modify this View in the View dropdown in document libraries.  (Our client has SharePoint 2010 but retains the 2007 Look and Feel.)

Modify_View

However, in Permissions there isn’t an option to Modify the view.  The two views are simply listed for selection.

Cannot_Modify_View

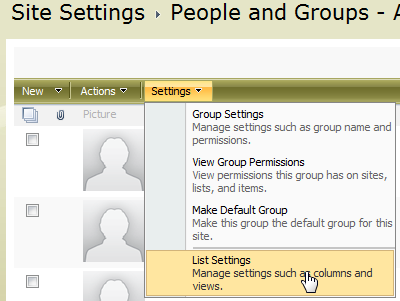
The answer is to go to the List Settings for this list, and scroll to the bottom of the page.   (The below image shows the 2007 Look and Feel prior to a Visual upgrade.  If you have the 2010 ribbon, List Settings should be on the ribbon.  If not, read on.)

People and Groups - List Settings

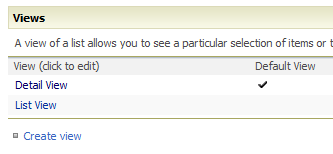
There you will find the two Views which you can now select and edit.  Notice that you can Create a view as well.

List Settings - Views

Problem solved, hopefully.  But what if List Settings is missing or disabled?  In that case, see this other post.

Creating a Contact Form Landing Page in SharePoint 2010

In SharePoint 2010, when you create an input form for a list, once the form is submitted, the user is redirected to the list.  Often, you will want to redirect the user to a landing page instead thanking them for their input or perhaps sharing with them something useful that is only to be shared after they submit a form (e.g. insider information, a welcome message, etc.).  To accomplish this is easier than you think: you simply need to append the url.

It would make sense if the parameter you pass through the url were labeled “redirect” but it’s not; the parameter is “source”.  Thus, to redirect a user to a landing page after they submit a form, simply follow this example:  <Path to List>/NewForm.aspx?Source=<Path to Landing page>

Example: http://contoso.com/Lists/<listname>/NewForm.aspx?Source=http://contoso.com/LandingPage.aspx

One caveat, this technique does not allow for using the modal window (aka “lightbox”) feature.  If /when I figure out how to do so, I’ll post it here.

Addendum: A day after posting the above, I discover an issue with the Cancel button.  The Source parameter works the same, regrettably, for both the Submit and the Cancel buttons; meaning, whether a user clicks Submit or Cancel, they are equally redirected to the Thanks page.  I need Cancel to take them elsewhere, preferably back to the previous  page.  I went looking for info on how to resolve this and discovered a great article at SharePointBriefing.com that covers my little, meager find on the Source parameter as well as the JQuery needed to resolve the Cancel issue.  Perfect.

Addendum 2: Salaudeen Rajack also provides an excellent article offering several clever ideas about this issue.

Best Practices for SharePoint 2010

I was performing a SharePoint 2010 assessment recently.   Among a great many other things, I went over their Windows Event logs, diagnostic logging, health and usage data collection, and web analytics.

I went to Google looking for best practices in these areas but was not very successful in finding succinct, solid information.  So I’m going to write an article on the matter in the very near future.  In the meantime, I would like to share an article I stumbled across from Microsoft that I found quite helpful in several other areas.

Read it here: SharePoint 2010 Best Practices

Hide Disabled Ribbon Commands in SharePoint 2010

A client has some of their users in limited permission groups, such as Read Only.  Thus, some of their ribbon commands for this limited group are disabled (“grayed out”).  The client wants for these users to not even see these grayed out ribbon commands both to cut down on the training issues and the complaining.

Tobias Lekman has written an excellent post on his blog about how to hide disabled ribbon commands as well as empty ribbon groups in SharePoint 2010.   To explain this second part, if an entire group of commands is disabled, and therefore not displayed, then you don’t want to display the empty ribbon group section either.  So his solution not only hides disabled commands but also any empty command group sections.

The solution uses some pretty simple CSS and some clever jQuery.  Good stuff.

For the type of person who just wants “the answer to the question” the above will suffice.  However, for the type of person that wants to know the How, Why, What For, and What Else (such as myself) there is a thorough article from Microsoft: Customizing and Extending the SharePoint 2010 Server Ribbon.

Missing PDF icon images in SharePoint 2010

I inherited a SharePoint 2010 environment that had the PDF iFilter installed but was not showing the PDF icon for any of the PDF files.  It took a lot to resolve this issue, which is crazy.  It should’ve been simple.  So I’m writing about my adventures to spare you all from the anguish I faced.  I’ve broken up this message into five sections since it’s long.

1.  The Microsoft KB article does not suffice
2.  SharePoint Sharon’s article has a fatal flaw
3.  Zubair Alexander to the rescue
4.  Double quotes pain
5.  Conclusion

Microsoft KB article
I figured I would just use the Microsoft KB article for installing the PDF iFilter since it also covers setting up the display of the PDF icon.  However, it leaves a lot to be desired.  Namely, the first three bullet points at the end are either vague or inaccurate.   First, I had trouble with “Restart the SharePoint Server Search 14” but another article clued me in on that.  (I have posted the instructions at the end of this article.)  Second, you do not need to reboot the SharePoint servers in the farm for this procedure.  Besides, wouldn’t rebooting the farm thus restart the Search Service thus making Step 1 unnecessary?  Think about it.   And third, there is absolutely no need to create a Test site collection and a document library to see if the PDF icons are working.  It is correct on the fourth item to perform a Full crawl.  That’s one out of four though.  It’s time to blow past this KB article.  <sarcasm>Thanks Microsoft.</sarcasm>

SharePoint Sharon
Going back to my Google results, I found this article which makes several mistakes as well but one stands apart.  First, it gives the correct url to the Adobe website for downloading the icon but then states to download the 17 x 17 icon.  NO!  The good news is that the icon there is 16 x 16, which are the correct dimensions.   Fatal flaw: I copied the code there for the <Mapping> section of the docIcon.xml file but it contains the wrong characters.  (I’ll show you in the double quotes section below.)  It does correctly remind to restart IIS and to perform a Full Crawl but doesn’t mention restarting the Search Service at all.  Simply put, this article doesn’t cut it either.

Zubair to the Rescue
Zubair Alexander offers a very thorough article on this issue.  He offers several registry changes to make/confirm, he explains how to restart the Search service, and he offers several helpful troubleshooting steps.  One minor flaw: he doesn’t provide the link (like the other two articles cited) for getting the 16 x 16 Adobe icon.  He just says in Step 8 to copy it but doesn’t provide for how to get it.  [It’s here, by the way.]  Most importantly, it was his Troubleshooting Step 9 (with the bright red Gotcha! ) that ultimately resolved my problem.

Double-Quotes Pain
I had copied the <Mapping> code directly from SharePoint Sharon’s site.  Upon very close inspection, sure enough, it contained the wrong double-quotes.  Painful.  See below and look very closely.  The double quotes in the section for pdf are different than the quotes in the other sections.

docIcon.xml with INCORRECT double quotes

docIcon.xml with INCORRECT double quotes

So I deleted the double quotes you see above and replaced them with “correct” double quotes and voila – my SharePoint 2010 farm now correctly shows the PDF icon next to PDF documents.  Success!

docIcon.xml with the CORRECT double quotes

docIcon.xml with the CORRECT double quotes

Conclusion
The process, therefore, for setting up the Adobe iFilter for 64-bit on SharePoint 2010 is thus:

  1.  Install PDF iFilter 9.0 (64 bit) from http://www.adobe.com/support/downloads/detail.jsp?ftpID=4025
  2. Download the 16 x 16 PDF icon from the Adobe web site http://www.adobe.com/misc/linking.html  or just right-click and Save this one:  pdf_icon   Then, copy it to C:\Program Files\Common Files\Microsoft Shared\Web Server Extensions\14\TEMPLATE\IMAGES\
  3. Add the following entry in docIcon.xml file, which can be found at: C:\Program Files\Common Files\Microsoft Shared\Web Server Extensions\14\TEMPLATE\XML   [You may need to change the name of the .gif in the code below to match your exact file name.]
    <Mapping Key=”pdf” Value=”pdf_icon.gif” />
  4. Add pdf file type to Search.  Go into the Search Service Application, File Types page (found on the left-hand navigation) and add the pdf file type.
  5. Add pdf file type to the registry.  Navigate to the following location in regedit: HKEY_LOCAL_MACHINE\SOFTWARE\Microsoft\Office Server\14.0\Search\Setup\ContentIndexCommon\Filters\Extension
  6. Right-click > Click New > Key to create a new key for .pdf
  7. Add the following GUID for the default value:
    {E8978DA6-047F-4E3D-9C78-CDBE46041603}
  8. Open a command prompt as Administrator.  We need to restart SharePoint search services.   Type the following lines, one at a time:
    net stop osearch14
    net start osearch14
  9. We now need to restart IIS.  In the command prompt window, simply type:
    iisreset
  10. Now, open Central Administration in SharePoint 2010, go to the Search Service Application, and perform a Full Crawl.

The Adobe PDF icon should now appear next to all PDFs.  If they do not, consider going back to Zubair’s site for his troubleshooting steps.  But first of all, make sure you have the correct double quotes in docIcon.xml.  That caused me a lot of grief and I want to make sure no one else struggles with it.

Disable and Hide Social Tags

SharePoint 2010 social tags

I have a client that wanted the social media functionalities to completely disappear from their SharePoint environment.  I found a website that demonstrates how to do this, complete with screenshots, and some very good explanations.  I have nothing to add to their fine work.  Just follow their directions.

Note: their site takes a while to load (at least for me on the several times I’ve visited) so give it some time.

SharePoint Indexing Performance Tuning Tips

David M. Sterling has written an excellent blog entry on tuning indexing performance.  I feel it’s very important and needs to be shared.  [Snippet below.]

There are many factors involved in the SharePoint crawling process that can impact indexing performance. There are also some steps you can take to improve that. Here are the common causes and their resolution:

1.  Indexing Performace is set at reduced
2.  Number of connections
3.  Crawled systems are slow or hosted on remote networks
4. Overlapping crawls
… and seven more.

Click here to to read the full article.

Page 4 of 5

Powered by WordPress & Theme by Anders Norén